DIY Dip Station Design
In 2012, I designed a PVC dip station that became one of the most popular resources on my site. When the site was hacked, the article vanished, but the requests for the plans never stopped. Using the original diagrams and materials list I recovered, I’ve rebuilt the guide exactly as it was.

Build Your Own PVC Parallel Bars
(Original 2012 Design Recreated)
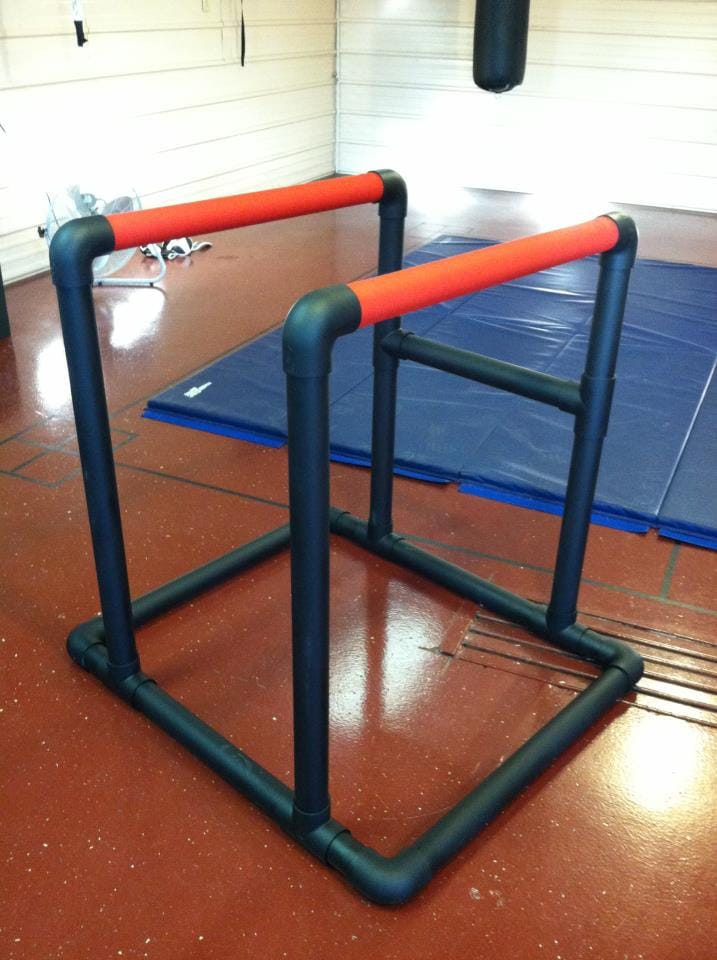
Hey everyone, Tom here from Tom Harvey Training. Back in 2012, I built a simple, sturdy DIY dip station out of 2" Schedule 40 PVC. It quickly became one of the most‑shared posts on my site, right up until the site was hacked and the article vanished. Since then, I’ve had a steady stream of people asking for the original plans. Thanks to the old diagrams and materials list I dug up, this is the exact reconstruction of that build.
This design held up incredibly well. I used it for dips, L‑sits, leg raises, inverted rows, and even planche progressions. It supported my bodyweight plus added load (tested up to 315 lbs total) without flex or tipping. If you want a reliable, low‑cost piece of equipment for your home or garage gym, this build delivers.
Total cost today? Around $40–70 depending on local PVC prices (2026 estimate).
Why Build Your Own PVC Dip Station?
- Affordable — far cheaper than commercial parallel bars
- Customizable — adjust height, width, and footprint
- Portable & Durable — lightweight but strong with Schedule 40 PVC
- Quick Build — 1–2 hours once you have the parts
- Field‑Tested — stable for dips, L‑sits, rows, and strict calisthenics work
Safety Note: Always test the structure unloaded, then with bodyweight, before adding load. PVC is strong, but homemade equipment always carries some risk.
Materials List (Matches Original 2012 Build)
This list is taken directly from the original diagram and BOM you uploaded. All cuts use 2" Schedule 40 PVC.
| Item | Qty | Description | Length (inches) | Notes |
|---|---|---|---|---|
| 1 | 8 | Elbow 90° 2" PVC Sch40 | N/A | Corners and joints |
| 2 | 6 | Tee Joint 2" PVC Sch40 | N/A | For cross connections |
| 3 | 1 | Oatey PVC/CPVC Purple Primer #30756 | N/A | Preps joints |
| 4 | 1 | Oatey PVC Cement #31013 | N/A | Permanent bonding |
| 5 | 2 | Mueller M Athletic Tape (Red) | 1" | Grip wrap |
| 6 | 1 | Direct‑to‑Plastic Spray Paint (Black) | N/A | Optional finish |
| A | 4 | 2" PVC Sch40 | 30.5" | Top rails / upper bars |
| B | 2 | 2" PVC Sch40 | 12" | Short verticals |
| C | 2 | 2" PVC Sch40 | 20.5" | Lower cross members |
| D | 2 | 2" PVC Sch40 | 35.25" or 35.5" | Long base rails |
| E | 4 | 2" PVC Sch40 | 5.5" | Short connectors |
| F | 3 | 2" PVC Sch40 | 20.5" | Cross braces |
Total PVC needed: ~30 ft
Recommended: Buy 10‑ft sections and cut to size.
Tools Required
- PVC pipe cutter or hacksaw
- Measuring tape
- Sandpaper (for smoothing cuts)
- Gloves (primer/cement gets messy)
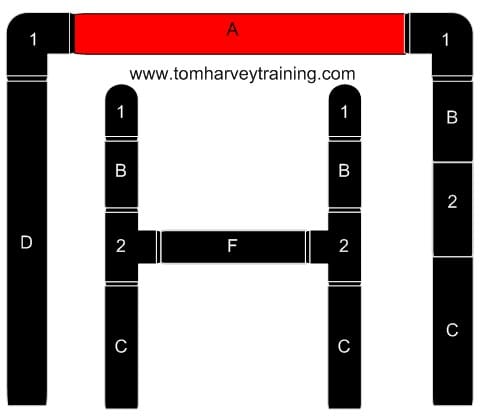
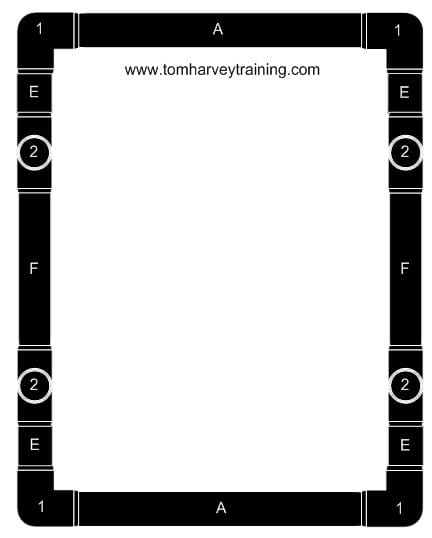
Assembly Diagrams
These are the original schematic views from the 2012 build.
Front / Isometric View
Shows the H‑frame structure with labeled zones A–F and joint types (1 = elbow, 2 = tee).
Top / Base View
Displays the rectangular base footprint and joint layout for stability.
Step‑by‑Step Build Instructions
1. Cut All Pieces
Measure twice, cut once. Sand the ends to remove burrs.
2. Dry‑Fit the Base
- Lay out the rectangle using D (long rails) and C (short rails).
- Add elbows (1) at the corners.
- Insert tees (2) where the uprights and braces will connect.
- Add one F brace across the base for rigidity.
3. Build the Uprights
- Insert the B verticals into the tees on the base.
- Add the E connectors above the verticals.
- Add the remaining F braces between the uprights to prevent racking.
4. Add the Top Rails
- Attach elbows (1) to the tops of the uprights.
- Insert the A rails to form the parallel bars.
- The design uses two A rails per side for added stiffness.
5. Glue the Structure
Once everything fits correctly:
- Apply purple primer to both pipe ends and fitting interiors.
- Apply PVC cement immediately after.
- Press and hold each joint for ~30 seconds.
- Work section by section, PVC cement sets fast.
6. Finishing Touches
- Wrap the top rails (A) with athletic tape for grip.
- Spray paint the entire structure black if desired.
- Let the whole station cure for 24 hours before use.
Dimensions Overview (Original 2012 Build)
- Height: ~12" verticals + elbow + top rail (low‑profile design)
- Width between bars: Determined by tee spacing (typically ~20–24")
- Base footprint: ~35" x 20"
This compact footprint was intentional, stable enough for dips and L‑sits without taking up much space.
This is the exact reconstruction of the original 2012 PVC dip station, same measurements, same layout, same build logic. If you recreate it, I’d love to see your version or any modifications you make.
Stay strong,
Tom Harvey
THT Systems
Originally posted March 25, 2012 — Revived January 2026